2009/11/29

buildroot

REF:  http://opencsl.openfoundry.org/Lab01_intro.rst.html

1. Get the latest Buildroot ... I do in this way...
svn co svn://uclibc.org/trunk/buildroot
:
At revision 26250
2. make menuconfig
(a) Target Architecture ==> (X) arm
(b) Toolchain ==> [*] Enable RPC
(c) Target filesystem options ==> [ ] ext2 root filesystem
(d) Kernel -> Kernel type ==> (X) none
3. make
:
extra/scripts/unifdef.c:209: error: conflicting types for ‘getline’
/usr/include/stdio.h:651: error: previous declaration of ‘getline’ was here
make[1]: *** [extra/scripts/unifdef] Error 1
make[1]: Leaving directory `/home2/yenping/buildroot/toolchain_build_arm/uClibc-0.9.30.1′
make: *** [/home/yenping/buildroot/toolchain_build_arm/uClibc-0.9.30.1/.configured] Error 2
 
 
3. vi ./toolchain_build_arm/uClibc-0.9.30.1/extra/scripts/unifdef.c
find all getline() , and replace as getline2()
there shall be 3 getline() to be replaced...
4. make
Just leave and have a break, because it may take times... :)  
 
5. vi ~/.bashrc and add below line
export PATH=~/buildroot/build_arm/staging_dir/usr/bin:$PATH
 
6. source ~/.bashrc
To be continued 

2009/11/23

gconf-sanity-check-2 exited with status 256

Terrible !!!

This morning, my Ubuntu 9.10 box message box showed 'gconf-sanity-check-2 exited with status 256' , and then I could not login my box anymore !!! But it's lucky, I could login as root.  Try to look for answers from google, but none of them worked !
[1] sudo chmod 755 /etc/gconf/*
[2] sudo chmod -Rc yenping:yenping /home/yenping

However, case [1] gave me some ideas, and I found permissions of /tmp becomes 755.
After below command, it works for me :)
[3] sudo chmod 777 /tmp

But I still have no more idea about that ~ confused !
Just keep records !

2009/11/14

Ubuntu 9.10, One Graphic Card for Dual Monitors

Ubuntu 9.10 x86_64 on Intel Q8490 + Nvidia GeForce 9400GT ...
the TwinView ...


[SYSTEM] - [MANAGEMENT] - [NVIDIA X Server Settings]


[O] X Server Information


[O] GPU 0 - (GeForce 9400 GT)


[O] X Server Display Configuration


Found NEX T4211N disabled (in fact, it shall be CHIMEI DTL-742E400, 42" LCD TV connected via HDMI)

Select Model: NEX T4211N
and click [Configure...]


Then choose [TwinView]


Set Resolution to 1920x1080,
and click [Apply] .

Then it works fine for me :)

[O] X Screen 0


It's interesting that screen captured will be ...
Left side on my CHIMEI CMV222H, and the RIGHT side on CHIMEI DTL-742E500


2009/11/06

OpenOffice 3.1.1 Installation

1. Download latest openoffice tar ball from http://download.openoffice.org/other.html

2. Extract tar ball to somewhere

3. cd somewhere/DEBS
4. sudo dpkg - i *.deb
5. cd desktop-integration
6. sudo dpkg - i *.deb

7. If something wrong with unexpected error and trying to recover Untitle 1 document again and again, just do 'rm ~/.openoffice.org', and re-install openoffice.


After that, everything works fine for me :)

ref: http://user.services.openoffice.org/en/forum/viewtopic.php?f=16&t=24322&start=0

2009/10/27

make swap file


Something found in the rcS,and try to understand what it is.

--- rcS --------------------------

dd if=/Test.fat of=/dev/rd/0
mount -t vfat /dev/rd/0 /mnt/rd
swapon /mnt/rd/swap.img

 :
----------------------------------

  
1. What is /dev/rd/0 ?

The RAMDISCS are placed in their own directory, and are named thus: 
/dev/rd/{0,1,2,...}
 

2. What does dd command do ? (manpages)

Convert and copy a file


3. How to generate something like Test.fat ?


yenping@YenPing:/tmp$ dd if=/dev/zero of=/tmp/mySWAP bs=1M count=128
128+0 records in
128+0 records out
134217728 bytes (134 MB) copied, 0.723966 s, 185 MB/s


yenping@YenPing:/tmp$ ll -h /tmp/mySWAP
-rw-r--r-- 1 yenping yenping 128M 2009-10-27 10:06 /tmp/mySWAP


yenping@YenPing:/tmp$ mkswap mySWAP
Setting up swapspace version 1, size = 131068 KiB
no label, UUID=c46d0a76-dbbd-4144-af6b-093a3e3e00c1


yenping@YenPing:/tmp$ free
             total       used       free     shared    buffers     cached
Mem:       2060436    2010644      49792          0     105424     293172
-/+ buffers/cache:    1612048     448388
Swap:       996020      56664     939356


yenping@YenPing:/tmp$ sudo swapon mySWAP
yenping@YenPing:/tmp$ free
             total       used       free     shared    buffers     cached
Mem:       2060436    2007576      52860          0     103944     291860
-/+ buffers/cache:    1611772     448664
Swap:      1127084      56664    1070420
 

yenping@YenPing:/tmp$ swapon -s
Filename                Type         Size      Used    Priority
/dev/sda3               partition    996020    56664    -1
/tmp/mySWAP             file         131064    0        -2

yenping@YenPing:/tmp$ sudo swapoff /tmp/mySWAP
yenping@YenPing:/tmp$ free
             total       used       free     shared    buffers     cached
Mem:       2060436    1977128      83308          0     102444     290332
-/+ buffers/cache:    1584352     476084
Swap:       996020      56664     939356


2009/10/13

pthread in eclipse

click Project -> Properties

C/C++ Build - Settings - [Tool Settings] - GCC C++ Linker

- Libraries ............. add  pthread
- Miscellaneous ..... add -lpthread

2009/09/19

doxygen - Source Code Documentation Tools

One day we were requested to document some source codes, and then I found Doxygen can do this well.  The output formats supported are HTML, PDF, LATEX, PS, RTF, QCH, QPH, MAN... It also provides some good graph/diagram output with graphViz.

You may visit them here ...
Besides, Eclox (http://eclox.eu/) is an doxygen frontend plugin for eclipse (http://www.eclipse.org/).


.

2009/09/15

OpenSolaries 2009.06

Finally the OpenSolaries 2009.06 was successfully installed.


RESOURCES:

OpenSolaris Live USB Creator (Windows/.NET) 

GENUNIX

2009/09/10

USB dongle detection

#include <stdio.h>
#include <stdlib.h>
#include <string.h>
#include <ctype.h>
#include <sys/un.h>
#include <sys/ioctl.h>
#include <sys/socket.h>
#include <linux/types.h>
#include <linux/netlink.h>
#include <errno.h>
#include <unistd.h>
#include <arpa/inet.h>
#include <netinet/in.h>

#define UEVENT_BUFFER_SIZE 2048

static int init_hotplug_sock()
{
const int buffersize = 1024;
int ret;

struct sockaddr_nl snl;
bzero(&snl, sizeof(struct sockaddr_nl));
snl.nl_family = AF_NETLINK;
snl.nl_pid = getpid();
snl.nl_groups = 1;

int s = socket(PF_NETLINK, SOCK_DGRAM, NETLINK_KOBJECT_UEVENT);
if (s == -1)
{
perror("socket");
return -1;
}
setsockopt(s, SOL_SOCKET, SO_RCVBUF, &buffersize, sizeof(buffersize));

ret = bind(s, (struct sockaddr *)&snl, sizeof(struct sockaddr_nl));
if (ret < 0)
{
perror("bind");
close(s);
return -1;
}

return s;
}

int main(int argc, char* argv[])
{
int hotplug_sock = init_hotplug_sock();

while(1)
{
/* Netlink message buffer */
char buf[UEVENT_BUFFER_SIZE * 2] = {0};
recv(hotplug_sock, &buf, sizeof(buf), 0);
printf("%s\n", buf);

}
return 0;
}


Insert USB dongle into USB socket

add@/devices/pci0000:00/0000:00:1d.7/usb1/1-6
add@/devices/pci0000:00/0000:00:1d.7/usb1/1-6/1-6:1.0
add@/devices/pci0000:00/0000:00:1d.7/usb1/1-6/1-6:1.0/host8
add@/devices/pci0000:00/0000:00:1d.7/usb1/1-6/1-6:1.0/host8/scsi_host/host8
add@/devices/pci0000:00/0000:00:1d.7/usb1/1-6/1-6:1.0/usb_endpoint/usbdev1.11_ep01
add@/devices/pci0000:00/0000:00:1d.7/usb1/1-6/1-6:1.0/usb_endpoint/usbdev1.11_ep82
add@/devices/pci0000:00/0000:00:1d.7/usb1/1-6/1-6:1.0/usb_endpoint/usbdev1.11_ep83
add@/devices/pci0000:00/0000:00:1d.7/usb1/1-6/usb_endpoint/usbdev1.11_ep00
add@/devices/pci0000:00/0000:00:1d.7/usb1/1-6/1-6:1.0/host8/target8:0:0
add@/devices/pci0000:00/0000:00:1d.7/usb1/1-6/1-6:1.0/host8/target8:0:0/8:0:0:0
add@/devices/pci0000:00/0000:00:1d.7/usb1/1-6/1-6:1.0/host8/target8:0:0/8:0:0:0/scsi_disk/8:0:0:0
change@/devices/pci0000:00/0000:00:1d.7/usb1/1-6/1-6:1.0/host8/target8:0:0/8:0:0:0
add@/devices/pci0000:00/0000:00:1d.7/usb1/1-6/1-6:1.0/host8/target8:0:0/8:0:0:0/block/sdb
add@/devices/pci0000:00/0000:00:1d.7/usb1/1-6/1-6:1.0/host8/target8:0:0/8:0:0:0/block/sdb/sdb1
add@/devices/virtual/bdi/8:16
add@/devices/pci0000:00/0000:00:1d.7/usb1/1-6/1-6:1.0/host8/target8:0:0/8:0:0:0/scsi_device/8:0:0:0
add@/devices/pci0000:00/0000:00:1d.7/usb1/1-6/1-6:1.0/host8/target8:0:0/8:0:0:0/scsi_generic/sg2

Remove USB dongle from USB socket

remove@/devices/pci0000:00/0000:00:1d.7/usb1/1-6/1-6:1.0/usb_endpoint/usbdev1.11_ep01
remove@/devices/pci0000:00/0000:00:1d.7/usb1/1-6/1-6:1.0/usb_endpoint/usbdev1.11_ep82
remove@/devices/pci0000:00/0000:00:1d.7/usb1/1-6/1-6:1.0/usb_endpoint/usbdev1.11_ep83
remove@/devices/pci0000:00/0000:00:1d.7/usb1/1-6/1-6:1.0/host8/target8:0:0/8:0:0:0/scsi_generic/sg2
remove@/devices/pci0000:00/0000:00:1d.7/usb1/1-6/1-6:1.0/host8/target8:0:0/8:0:0:0/scsi_device/8:0:0:0
remove@/devices/pci0000:00/0000:00:1d.7/usb1/1-6/1-6:1.0/host8/target8:0:0/8:0:0:0/scsi_disk/8:0:0:0
remove@/devices/pci0000:00/0000:00:1d.7/usb1/1-6/1-6:1.0/host8/target8:0:0/8:0:0:0/block/sdb/sdb1
remove@/devices/virtual/bdi/8:16
remove@/devices/pci0000:00/0000:00:1d.7/usb1/1-6/1-6:1.0/host8/target8:0:0/8:0:0:0/block/sdb
remove@/devices/pci0000:00/0000:00:1d.7/usb1/1-6/1-6:1.0/host8/target8:0:0/8:0:0:0
remove@/devices/pci0000:00/0000:00:1d.7/usb1/1-6/1-6:1.0/host8/scsi_host/host8
remove@/devices/pci0000:00/0000:00:1d.7/usb1/1-6/1-6:1.0/host8
remove@/devices/pci0000:00/0000:00:1d.7/usb1/1-6/1-6:1.0
remove@/devices/pci0000:00/0000:00:1d.7/usb1/1-6/usb_endpoint/usbdev1.11_ep00
remove@/devices/pci0000:00/0000:00:1d.7/usb1/1-6
remove@/host8/target8:0:0

2009/07/19

Linked List (Single/Double)

=================== LINKED LIST DEMO ===================
[ ] [D]-[0xbfb6b5cc]-[11]-[Albert]
[ ] [D]-[0xbfb6b5f0]-[12]-[Benson]
[ ] [D]-[0xbfb6b614]-[13]-[Cano  ]
[ ] [D]-[0xbfb6b638]-[14]-[David ]
[ ] [D]-[0xbfb6b65c]-[15]-[Elvin ]
[ ] [D]-[0xbfb6b680]-[16]-[Fan   ]
[ ] [D]-[0xbfb6b6a4]-[17]-[Gary  ]
[ ] [D]-[0xbfb6b6c8]-[18]-[Helen ]
[ ] [D]-[0xbfb6b6ec]-[19]-[Ivan  ]
[ ] [D]-[0xbfb6b710]-[20]-[John  ]
[V] [D]-[0xbfb6b6a4]-[17]-[Gary  ]
[ ] [D]-[0xbfb6b734]-[21]-[Kevin ]
[ ] [D]-[0xbfb6b758]-[99]-[.Orz  ]
[ ] [D]-[0xbfb6b5cc]-[11]-[Albert]
[ ] [D]-[0xbfb6b5f0]-[12]-[Benson]
[ ] [D]-[0xbfb6b614]-[13]-[Cano  ]
[ ] [D]-[0xbfb6b638]-[14]-[David ]
[ ] [D]-[0xbfb6b65c]-[15]-[Elvin ]
[ ] [D]-[0xbfb6b680]-[16]-[Fan   ]
--------------------------------------------------------
[1] Insert [2] Delete [3]        [4]        [5]         
[6] Next   [7] Prev   [8] Head   [9] Tail   [0] Quit    
==> Your choice is : 6

Balanced Tree

AVL Balanced tree program written in C. Refer to http://en.wikipedia.org/wiki/AVL_tree. This program can display a tree structure as below. It also have a cursor which can be moved by numeric key (1-9). Cursor node is also highlight displayed :)

==================== Balance Tree (6)====================
[13](-1)----[38](-1)----[57](+1)----[90](+0)----[99](+0)
  |           |           |           +----[86](+0)
  |           |           +----[44](-1)----[54](+1)
  |           |                       |           +----[50](+0)
  |           |                       +----[39](+0)
  |           +----[23](+0)----[29](+0)----[35](+0)
  |                       |           +----[26](+0)
  |                       +----[19](+1)
  |                                   +----[14](+0)
  +----[10](+1)----[12](+1)
              |           +----[11](+0)
              +----[06](-1)----[08](+0)----[09](+0)
                          |           +----[07](+0)
                          +----[04](+0)
Cursor [29]
========== TREE OPERATION MENU ==========================
[7] Root     [8] Up      [9] Largest  [ ]      
[4] Up/Leftt [5] Left    [6] Right    [ ]      
[1] Smallest [2] LeftMost[3] RightMost[ ]      
        [0] INSERT  [.] DELETE   [q] QUIT 
==> Your Choice :


2009/07/12

getch() in Linux

A good reference from http://blog.csdn.net/t_larry/archive/2006/04/06/653124.aspx
#include <termios.h>
#include <unistd.h>
#include <assert.h>
#include <string.h>
/*------------------------------------------------*/
int getch(void) {
      int c=0;

      struct termios org_opts, new_opts;
      int res=0;
          //-----  store old settings -----------
      res=tcgetattr(STDIN_FILENO, &org_opts);
      assert(res==0);
          //---- set new terminal parms --------
      memcpy(&new_opts, &org_opts, sizeof(new_opts));
      new_opts.c_lflag &= ~(ICANON | ECHO | ECHOE | ECHOK | ECHONL | ECHOPRT | ECHOKE | ICRNL);
      tcsetattr(STDIN_FILENO, TCSANOW, &new_opts);
      c=getchar();
          //------  restore old settings ---------
      res=tcsetattr(STDIN_FILENO, TCSANOW, &org_opts);
      assert(res==0);
      return(c);
}

2009/06/30

Updates to Qt and Qt Creator ...

On June 25, Nokia announced the release of updates to Qt. - Qt Creator 1.2 - Qt 4.5.2 Download is available at http://www.qtsoftware.com/downloads

2009/06/23

SQLite

SQLite in 5 minutes or less http://www.sqlite.org/quickstart.html

RFID Application

RFID Application - SQLite + Serial/Socket Programming SQLite DB<=>logServer<=>RFID Reader(S/W)<=>RFID Reader(H/W)<=>Tag 1. Create a database for RFID Tags. 2. RFID Reader(S/W) read tag information via /dev/ttyS0.It sends the Tag ID to logServer for identification. 3. logServer receives Tag Info from RFID Reader and checks with SQLIte DB. Then feedback results to RFID Reader to take further actions. The log information is also logged into SQLite DB. 4. Log information can be browsed. .

2009/06/21

RFID Reader - ttyS0

Refererence, 1. Serial Programming Guide for POSIX Operating Systems 2. Serial Programming HOWTO (Translated) 3. Summit RFID Reader 4. QextSerialPort ... a Qt Serial Class Programmed as below,
#include <stdio.h>   /* Standard input/output definitions */
#include <string.h>  /* String function definitions */
#include <unistd.h>  /* UNIX standard function definitions */
#include <fcntl.h>   /* File control definitions */
#include <errno.h>   /* Error number definitions */
#include <termios.h> /* POSIX terminal control definitions */


char DEV_RFID[16]="/dev/ttyS0";


int main(int argc, char **argv)
{

  struct timeval timeout;
      timeout.tv_sec  = 0;
      timeout.tv_usec = 500;

  // ttyS1 can be chosed if ttyS0 is in used
  if(argc>1)
      strcpy(DEV_RFID, "/dev/ttyS1");

  fprintf(stdout, "[RFID] ----------- DEMO -------------------\n");
  fprintf(stdout, "[RFID] Connecting to %s\n", DEV_RFID);

  // Open a Serial Port
  int fd;
  fd = open(DEV_RFID, O_RDWR | O_NOCTTY);
  if (fd < 0) {
      perror(DEV_RFID);
      exit(1);
  }
  fprintf(stdout, "[RFID] %s is connected\n", DEV_RFID);

  struct termios oldtio, newtio;

  // Gets the current serial port settings.
  tcgetattr(fd, &oldtio);
  bzero(&newtio, sizeof(newtio));

  // Termios Structure Members --------------------------------------
  // Control options, 19200 baud/8 data bits/Enable receiver/Local line
      newtio.c_cflag |= (B19200|CS8|CREAD|CLOCAL);
      newtio.c_lflag &= (~(ICANON|ECHO|ECHOE|ECHOK|ECHONL|ISIG));
  // Input options
      newtio.c_iflag &= (~(INPCK|IGNPAR|PARMRK|ISTRIP|ICRNL|IXANY));
  // Output options
      newtio.c_oflag &= (~OPOST);
  // Control characters
      newtio.c_cc[VMIN]  = 0;
  newtio.c_cc[VTIME] = 5;

  // no flow control
  newtio.c_cflag&=(~CRTSCTS);
  newtio.c_iflag&=(~(IXON|IXOFF|IXANY));

  // Flushes the input and/or output queue.
  tcflush(fd, TCIFLUSH);
  // Make changes now without waiting for data to complete
  tcsetattr(fd, TCSANOW, &newtio);

  // Variables for Read/Write
  char cmd[3] = { 0x1B, 'I', 0x0D };
  unsigned char buf[256]={0} ;
  char id[32]={0}, chs[2]={0};
  int  i=0, res;

  while(1) {
      bzero(id, sizeof(id));
      fprintf(stdout, "[RFID] Reading ...\n");  
      // Send Request to RFID Reader
      write(fd, cmd, 3);
      // Read Response from RFID Reader
      res = read(fd, buf, 16);
      // Print the Response in Hex
      if(res > 0) {   
              // Convert Response into Hex Format
          // For checking the Respones String 
          for(i=0; i<res; i++) {  
             sprintf(chs, "%02X", buf[i]);     
                strcat(id, chs );
          }
          fprintf(stdout, "[RFID] Card ID: ");
          fprintf(stdout, " %s\n", id);
      }      
            sleep(3);  
  }  

  // Close DEV_RFID used.
  close(fd);
  fprintf(stdout, "\n[RFID] Closed\n");

  // Restore old terminal settings
  tcsetattr(fd, TCSANOW, &oldtio);
  fprintf(stdout, "[RFID] ---------- End of Program ----------\n");
  return 0;
}
$ ./myRFIDreader 1 [RFID] ----------- DEMO ------------------- [RFID] Connecting to /dev/ttyS1 [RFID] /dev/ttyS1 is connected [RFID] Reading ... [RFID] Card ID: 1B054661696C21 (Nothing read return value) [RFID] Reading ... [RFID] Card ID: 1B054661696C21 [RFID] Reading ... [RFID] Card ID: 1B0E0F3871C1CD0A (Part of Card 1) [RFID] Reading ... [RFID] Card ID: 8007E000003F038B (Part of Card 1) [RFID] Reading ... [RFID] Card ID: 1B0E0F3058C1CD0A8007E000003F038B (Card 1 No.) [RFID] Reading ... [RFID] Card ID: 1B054661696C21 [RFID] Reading ... [RFID] Card ID: 1B054661696C21 [RFID] Reading ... [RFID] Card ID: 1B0E0F3871C1CD0A8007E000003F038B (Card 2 No.) [RFID] Reading ... [RFID] Card ID: 1B054661696C21 [RFID] Reading ... [RFID] Card ID: 1B054661696C21 .

2009/06/03

Bluetooth - Programming

Codes modified from Bluetooth Essential for Programmer.
#include <stdio.h>
#include <unistd.h>
#include <sys/socket.h>
#include <bluetooth/bluetooth.h>
#include <bluetooth/rfcomm.h>

int main(int argc, char **argv)
{
   struct sockaddr_rc addr = { 0 };
   int s, status, bytes_read;
   char buf[1] = { 0 };
   char dest[18] = "00:0B:0D:6C:36:0B";

   // allocate a socket
   s = socket(AF_BLUETOOTH, SOCK_STREAM, BTPROTO_RFCOMM);

   // set the connection parameters (who to connect to)
   addr.rc_family = AF_BLUETOOTH;
   addr.rc_channel = 1;
   str2ba( dest, &addr.rc_bdaddr );

   // connect to server
   status = connect(s, (struct sockaddr *)&addr, sizeof(addr));

   // send a message
   if( 0 == status ) {

       while(1) {
           // read data from the client
           bytes_read = recv(s, buf, sizeof(buf), 0);
           //if( bytes_read > 0 ) {
               printf("%c", buf[0]);
          // }   
       }
   }

   if( status < 0 ) perror("uh oh");

   close(s);
   return 0;
}
# gcc rfcomm-client.c -lbluetooth # ./a.out $GPGGA,153226.985,2459.7755,N,12128.0203,E,0,00,,32.1,M,15.2,M,,0000*43 $GPRMC,153226.985,V,2459.7755,N,12128.0203,E,,,030609,,,N*7C $GPVTG,,T,,M,,N,,K,N*2C $GPGGA,153227.985,2459.7755,N,12128.0203,E,0,00,,32.1,M,15.2,M,,0000*42 $GPGSA,A,1,,,,,,,,,,,,,,,*1E $GPGSV,3,1,12,11,79,010,17,07,68,190,,08,63,334,,25,46,185,*70 $GPGSV,3,2,12,17,27,267,,28,20,334,,19,20,025,,32,10,117,*7D $GPGSV,3,3,12,22,08,029,,15,08,331,16,20,07,144,14,03,03,050,*77 $GPRMC,153227.985,V,2459.7755,N,12128.0203,E,,,030609,,,N*7D

Bluetooth - Resources

Bluez is the Official Linux Bluetooth protocol stack. Bluetooth Essential for Programmer has some sample codes. An Introduction to Bluetooth Programming ...

Bluetooth - GPSlim236 GPS (2)

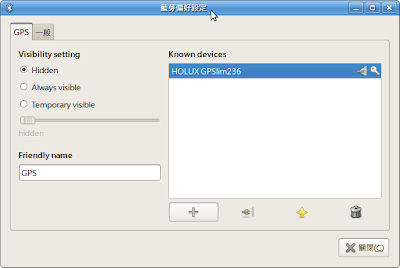
1. Scan if any bluetooth device here ... # hcitool scan Scanning ... 00:0B:0D:6C:36:0B HOLUX GPSlim236 2. Bind the RFCOMM device to the remote bluetooth device. # rfcomm bind /dev/rfcomm0 00:0B:0D:6C:36:0B 3. Check the RFCOMM device is created or not. # ls -al /dev/rfcomm0 crw-rw---- 1 root root 216, 0 2009-06-03 21:19 /dev/rfcomm0 4. Check current RFCOMM device informaion. # rfcomm -a rfcomm0: 00:0B:0D:6C:36:0B channel 1 closed 5. Check if we can read data from my GPS in other terminal ... # cat /dev/rfcomm0 $GPGGA,143236.991,2459.7755,N,12128.0203,E,0,00,,32.1,M,15.2,M,,0000*46 $GPRMC,143236.991,V,2459.7755,N,12128.0203,E,,,030609,,,N*79 $GPVTG,,T,,M,,N,,K,N*2C $GPGGA,143237.991,2459.7755,N,12128.0203,E,0,00,,32.1,M,15.2,M,,0000*47 $GPGSA,A,1,,,,,,,,,,,,,,,*1E $GPGSV,3,1,12,11,85,202,,07,76,233,,25,58,195,,08,48,328,17*7D $GPGSV,3,2,12,19,31,022,,17,16,257,,28,14,321,,03,13,047,*7D $GPGSV,3,3,12,32,07,130,,13,07,214,,22,05,042,,20,04,156,*7B : : WoW...It really works :) 6. Check RFCOMM device information again. # rfcomm -a rfcomm0: 00:0B:0D:6C:36:0B channel 1 connected [tty-attached] 7. Remember Bluetooth Icon in system tray, select Preference Setting, a connected icon is shown. You may stop receive data from GPS by click the disconnect button ! The cat /dev/rfcomm0 will stop then. .

Bluetooth - GPSlim236 GPS

Bluetooth is supported in Linux kernel 2.4 and 2.6. Holux GPSlim236 GPS information can be found in http://www.holux.com/JCore/en/products/products_content.jsp?pno=340 To make GPSlim236 works in Ubuntu 9.04, 1. Insert an USB Bluetooth Dongle.(D-Link DBT-122T) 2. The device shall be detected automatically by Ubuntu, and the bluetooth icon shall appear in the system tray. 3. Right click the bluetooth icon and select Preference Setting. Then the Preference Setting window will appear as below. 4. Give an Friendly name (GPS) and click + button to continue. Click FORWARD button. 5. Select Use fixed PIN Code, and select pin code 0000 in my case. Bluetooth devices detected may appear in window few seconds later. 6. Choose HOLUX GPSlim236 and Click FORWARD button. Few seconds later, succesfully configuration message will appear. Next we have to check if the GPS data can be read exactly. to be continued ... .