2009/05/28
Google Maps API
1. Sign Up for the Google Maps API
at http://code.google.com/intl/zh-TW/apis/maps/signup.html
You shall key in your web site URL and press the Generate API Key button.
2. Then you will get a Google Maps API Key. Remember to keep your key somewhere.
3. Go to Google Code - Code Playground to learn more about it.
4. Here provide some tricks to use Google Maps API in google's blogger.
2009/05/26
nmap - port scanner
When surfing internet, somebody mentioned nmap - a powerful port scanning program.

$ sudo apt-get install nmap

$ nmap -A localhost

Starting Nmap 4.76 ( http://nmap.org ) at 2009-05-26 22:48 CST
Warning: Hostname localhost resolves to 2 IPs. Using 127.0.0.1.
SCRIPT ENGINE: '/usr/share/nmap/scripts/dns-test-open-recursion.nse' threw a run time error and could not be loaded.
SCRIPT ENGINE: '/usr/share/nmap/scripts/skype_v2-version.nse' threw a run time error and could not be loaded.
SCRIPT ENGINE: error while initializing script rules:
/usr/share/nmap/scripts/script.db:20: rpcinfo.nse is not a file!
stack traceback:
 [C]: in function 'Entry'
 /usr/share/nmap/scripts/script.db:20: in main chunk
 [C]: ?
 [C]: ?

SCRIPT ENGINE: Aborting script scan.
Interesting ports on localhost (127.0.0.1):
Not shown: 995 closed ports
PORT     STATE SERVICE     VERSION
80/tcp   open  http        Apache httpd 2.2.11 ((Ubuntu) PHP/5.2.6-3ubuntu4.1 with Suhosin-Patch)
139/tcp  open  netbios-ssn Samba smbd 3.X (workgroup: WORKGROUP)
445/tcp  open  netbios-ssn Samba smbd 3.X (workgroup: WORKGROUP)
631/tcp  open  ipp         CUPS 1.3.9
3306/tcp open  mysql       MySQL 5.0.75-0ubuntu10

Service detection performed. Please report any incorrect results at http://nmap.org/submit/ .
Nmap done: 1 IP address (1 host up) scanned in 11.25 seconds
$
2009/05/19
semaphore
A simple semaphore program modified from Beginning Linux Programming 4/e. The sem_getvalue() is used to get semaphore value for test purpose only.And also the return value of a thread is given by pthread_exit() in thread function.
#include <stdio.h>
#include <unistd.h>
#include <stdlib.h>
#include <string.h>
#include <pthread.h>
#include <semaphore.h>

#define  SIZE   64
char     work_area[SIZE];
sem_t    b_semaphore; // binary semaphore

void *thread_func(void *arg)
{
int sval;

sem_getvalue(&b_semaphore, &sval);
printf("Semaphore Value at thread_func() begining = %d\n", sval);

sem_wait(&b_semaphore);
sem_getvalue(&b_semaphore, &sval);
printf("Semaphore Value after first sem_wait() = %d\n", sval);

while(strncmp("end", work_area, 3)!=0) {
     printf("[%2d] - %s\n", strlen(work_area)-1, work_area);
     sem_wait(&b_semaphore);
     sem_getvalue(&b_semaphore, &sval);
     printf("Semaphore Value in thread_func() = %d\n", sval);
}

pthread_exit("WoW ! End of Thread...\n");
}

int main()
{
int sval;

pthread_t thread_1;
void *thread_result;

sem_init(&b_semaphore, 0, 0);
sem_getvalue(&b_semaphore, &sval);
printf("Semaphore Value after sem_init() = %d\n", sval);

pthread_create(&thread_1, NULL, thread_func, NULL);

printf("Input something, and 'end' to exit\n");
while( strncmp("end", work_area, 3)!=0) {
    printf("Input : ");
    fgets(work_area, SIZE, stdin);

    sem_post(&b_semaphore);

    sem_getvalue(&b_semaphore, &sval);
    printf("Semaphore Value after sem_post() = %d\n", sval);
    sleep(1);
}

printf("Waiting for thread to finish program...\n");
pthread_join(thread_1, &thread_result);

printf("Thread Result : %s\n", (char *)thread_result);
sem_destroy(&b_semaphore);

return 0;
}
$ gcc semaphore.c -o semaphore -lpthread $ ./semaphore
Semaphore Value after sem_init() = 0
Semaphore Value at thread_func() begining = 0
Input something, and 'end' to exit
Input : 1234
Semaphore Value after first sem_wait() = 0
[ 4] - 1234

Semaphore Value after sem_post() = 0
Input : Hello Semaphore !
Semaphore Value after sem_post() = 1
Semaphore Value in thread_func() = 0
[17] - Hello Semaphore !

Input : end
Semaphore Value after sem_post() = 1
Semaphore Value in thread_func() = 0
Waiting for thread to finish program...
Thread Result : WoW ! End of Thread...
From above results, we know the semaphore is immediately taken away by thread when it is just released by main thread. But after that, it is not. Why ? Need to test more :) .
2009/05/18
pthread - pthread_create(), pthread_join()
A simple program with threads. It also demostrates how the parameters are passed to the thread functions.
#include <stdio.h>
#include <stdlib.h>
#include <time.h>
#include <pthread.h>

#define MAX_1    5
#define MAX_2   10

/* ref: http://en.wikipedia.org/wiki/POSIX_Threads */

static void wait(void)
{
 time_t start_time = time(NULL);

 while (time(NULL) == start_time)
 {
     /* do nothing except chew CPU slices for up to one second */
 }
}

static void *thread_func1(void *vptr_args)
{
 int i;

 for (i = 1; i <= MAX_2; i++) {
      printf("[#1] (%2d/%2d) - %s\n", i, MAX_2, (char *)vptr_args);
      wait();
 }
 printf("[#1] --- End of #1 ---\n");

 return NULL;
}

static void *thread_func2(void *vptr_args)
{
 int i;

 for (i = 1; i <= MAX_2; i++) {
      printf("[#2] (%2d/%2d) - t_count = %d\n", i, MAX_2, (*(int *)vptr_args)++);
      wait();
 }
 printf("[#2] --- End of #2 ---\n");

 return NULL;
}

int main(void)
{
 int i;
 pthread_t thread_1, thread_2;
 char *t_param = "Hello Thread !";
 int   t_count = 1;

 pthread_create(&thread_1, NULL, thread_func1, (void *) t_param );
 pthread_create(&thread_2, NULL, thread_func2, (void *) &t_count);

 for (i = 1; i <= MAX_1; i++) {
     printf("[#0] (%2d/%2d) - t_count = %d \n", i, MAX_1, t_count);
     wait();
 }
 printf("[#0] --- End of #0 ---\n");

//    pthread_join(thread_1, NULL);
//    pthread_join(thread_2, NULL);

 printf("[  ] ------ End ------\n");

 return EXIT_SUCCESS;
}
Compile the source code with -lpthread. $ gcc pthread.c -o pthread -lpthread $ ./pthread
[#1] ( 1/10) - Hello Thread !
[#2] ( 1/10) - t_count = 1
[#0] ( 1/ 5) - t_count = 2
[#0] ( 2/ 5) - t_count = 2
[#1] ( 2/10) - Hello Thread !
[#2] ( 2/10) - t_count = 2
[#2] ( 3/10) - t_count = 3
[#1] ( 3/10) - Hello Thread !
[#0] ( 3/ 5) - t_count = 4
[#1] ( 4/10) - Hello Thread !
[#2] ( 4/10) - t_count = 4
[#0] ( 4/ 5) - t_count = 5
[#1] ( 5/10) - Hello Thread !
[#2] ( 5/10) - t_count = 5
[#0] ( 5/ 5) - t_count = 6
[#2] ( 6/10) - t_count = 6
[#0] --- End of #0 ---
[  ] ------ End ------
Oh ! Both threads are not completed when main program terminates.
Uncomment both pthread_join() to wait threads terminate,
    pthread_join(thread_1, NULL);
    pthread_join(thread_2, NULL);
$ gcc pthread.c -o pthread_join -lpthread $ ./pthread_join
[#1] ( 1/10) - Hello Thread !
[#2] ( 1/10) - t_count = 1
[#0] ( 1/ 5) - t_count = 2
[#0] ( 2/ 5) - t_count = 2
[#1] ( 2/10) - Hello Thread !
[#2] ( 2/10) - t_count = 2
[#1] ( 3/10) - Hello Thread !
[#2] ( 3/10) - t_count = 3
[#0] ( 3/ 5) - t_count = 4
[#1] ( 4/10) - Hello Thread !
[#0] ( 4/ 5) - t_count = 4
[#2] ( 4/10) - t_count = 4
[#1] ( 5/10) - Hello Thread !
[#0] ( 5/ 5) - t_count = 5
[#2] ( 5/10) - t_count = 5
[#0] --- End of #0 ---
[#1] ( 6/10) - Hello Thread !
[#2] ( 6/10) - t_count = 6
[#2] ( 7/10) - t_count = 7
[#1] ( 7/10) - Hello Thread !
[#2] ( 8/10) - t_count = 8
[#1] ( 8/10) - Hello Thread !
[#1] ( 9/10) - Hello Thread !
[#2] ( 9/10) - t_count = 9
[#1] (10/10) - Hello Thread !
[#2] (10/10) - t_count = 10
[#1] --- End of #1 ---
[#2] --- End of #2 ---
[  ] ------ End ------
Main thread will wait another two threads by thread_join().
.
ARM Emulator by QEMU on Ubuntu 9.04
From google, we know it's possible to emulate ARM in Ubuntu.
First, we have to install qemu.
$ sudo apt-get install qemu
It seems version qemu 0.10.0. If you want to get the latest one, please link to http://www.nongnu.org/qemu/download.html.
Second, we have to get an ARM image in above page or direct download from http://www.nongnu.org/qemu/arm-test-0.2.tar.gz
Decompress the tarball into some directory, and execute below command.
$ sudo qemu-system-arm -kernel zImage.integrator -initrd arm_root.img
Click into the window, login as root without any password. Press Ctrl-Alt to exit grab.
 But what to do next ? Let me think if we can do something with this :)
 But what to do next ? Let me think if we can do something with this :)
2009/05/16
No manual entry
For Ubuntu 9.04
When requesting the usage of fputs() in my Ubuntu 9.04, I got no manual entry for fputs(). Google tells me ...
$ man fputs
No manual entry for fputs
$ sudo apt-get install manpages-dev manpages-posix-dev glibc-doc
@ 2009-11-17
manpages-posix-dev ... for pthread ...
glibc-doc ... for others...
.
When requesting the usage of fputs() in my Ubuntu 9.04, I got no manual entry for fputs(). Google tells me ...
$ man fputs
No manual entry for fputs
$ sudo apt-get install manpages-dev manpages-posix-dev glibc-doc
@ 2009-11-17
manpages-posix-dev ... for pthread ...
glibc-doc ... for others...
.
2009/05/15
signal() and kill command
#include <signal.h>
#include <stdio.h>
#include <unistd.h>

void ouch(int sig)
{
printf(" <--- OUCH ! - Got signal - %d\n", sig);
signal(SIGINT, SIG_DFL);
}

int main()
{
signal(SIGINT, ouch);

while(1) {
  printf("Hello SIGINT !\n");
  sleep(1);
}
}
signal in main(): set ouch() as the SIGINT handler signal in ouch(): set SIGINT handler to default, terminate process If you SIGINT handler is not reset to default, the process can not be interrupted by Ctrl+C. $ man signal (a good man in linux)
:
First the signals described in the original POSIX.1-1990 standard.

Signal     Value     Action   Comment
----------------------------------------------------------------------
SIGHUP        1       Term    Hangup detected on controlling terminal
                             or death of controlling process
SIGINT        2       Term    Interrupt from keyboard
SIGQUIT       3       Core    Quit from keyboard
SIGILL        4       Core    Illegal Instruction
SIGABRT       6       Core    Abort signal from abort(3)
SIGFPE        8       Core    Floating point exception
SIGKILL       9       Term    Kill signal
SIGSEGV      11       Core    Invalid memory reference
SIGPIPE      13       Term    Broken pipe: write to pipe with no
                             readers
SIGALRM      14       Term    Timer signal from alarm(2)
SIGTERM      15       Term    Termination signal
SIGUSR1   30,10,16    Term    User-defined signal 1
SIGUSR2   31,12,17    Term    User-defined signal 2
SIGCHLD   20,17,18    Ign     Child stopped or terminated
SIGCONT   19,18,25    Cont    Continue if stopped
SIGSTOP   17,19,23    Stop    Stop process
SIGTSTP   18,20,24    Stop    Stop typed at tty
SIGTTIN   21,21,26    Stop    tty input for background process
SIGTTOU   22,22,27    Stop    tty output for background process

The  signals SIGKILL and SIGSTOP cannot be caught, blocked, or ignored.

:

The  entries  in  the  "Action"  column of the tables below specify the
default disposition for each signal, as follows:

Term   Default action is to terminate the process.
Ign    Default action is to ignore the signal.
Core   Default action is to terminate the process and  dump  core  (see
      core(5)).
Stop   Default action is to stop the process.
Cont   Default  action  is  to  continue the process if it is currently
       stopped.
:
Running the program, and test
$ ./a.out
Hello SIGINT !
Hello SIGINT !
^C <--- OUCH ! - Got signal - 2
Hello SIGINT !
Hello SIGINT !
Hello SIGINT !
^C
$

Below red ones are command from other terminal. PID is got from ps ax | grep a.out.

$ kill -19 4100 (stop process)
Hello SIGINT !
Hello SIGINT !

[1]+  Stopped                 ./a.out
$

$ kill -18 4100 (continue process if stopped)
$ Hello SIGINT !
Hello SIGINT !
Hello SIGINT !
Hello SIGINT !
$ kill -2 4100 (keyboard interrupt Ctrl+C)
^C <--- OUCH ! - Got signal - 2
Hello SIGINT !
$ kill -2 4100 (keyboard interrupt Ctrl+C)
[1]+  中斷                  ./a.out
$


$ kill -15 4107 (terminate process)
Hello SIGINT !
Hello SIGINT !
終止 (terminated)
$

$ kill -9 4369 (kill process)
Hello SIGINT !
已砍掉 (killed)
$

.
2009/05/12
QT Resource File
Create your own RESOURCE FILE with .qrc extension, and its format as below
 (Icons and application in the same directory.)
 (Icons and application in different directory)
Check the file size, the _QtRC (executable with embedded resources) has larger size than the executable _QtRCwoRC without embedded resources.
(Icons and application in different directory)
Check the file size, the _QtRC (executable with embedded resources) has larger size than the executable _QtRCwoRC without embedded resources.
<!DOCTYPE RCC><RCC version="1.0">
<qresource>
    <file>Panda_32x32.png</file>
<file>Turtle_32x32.png</file>
</qresource>
</RCC>
Execute qmake -project, the RESOURCES += myRC.qrc will be added in project (.pro) file
#####################################################################
# Automatically generated by qmake (2.01a) ?? 5? 12 11:36:22 2009 #
#####################################################################
TEMPLATE = app
TARGET =
DEPENDPATH += .
INCLUDEPATH += .
#
Input SOURCES += qrc.cpp
RESOURCES += myRC.qrc
qmake again to generate Makefile
in Makefile...
qrc_myRC.cpp: myRC.qrc \
                Turtle_32x32.png \
                Panda_32x32.png
        /opt/qtsdk-2009.01/qt/bin/rcc -name myRC myRC.qrc -o qrc_myRC.cpp
The qrc_myRC.cpp will be generated if make is executed. Now we can execute make to produce the executable file check the contents of qrc_myRC.cpp after make......
static const unsigned char qt_resource_data[] = {
  // /home/chanyenping/200905/IMAGE/_QtRC/Turtle_32x32.png
  0x0,0x0,0x9,0x40,
  0x89,
  0x50,0x4e,0x47,0xd,0xa,0x1a,0xa,0x0,0x0,0x0,0xd,0x49,0x48,0x44,0x52,0x0,
  0x0,0x0,0x20,0x0,0x0,0x0,0x20,0x8,0x6,0x0,0x0,0x0,0x73,0x7a,0x7a,0xf4,
  0x0,0x0,0x9,0x7,0x49,0x44,0x41,0x54,0x58,0x85,0xa5,0xd7,0x79,0x6c,0x1c,0xe5,
  0x19,0xc7,0xf1,0xef,0x9c,0xbb,0x3b,0xbb,0x6b,0x8f,0x9d,0xb5,0xe3,0x38,0x8e,0xe3,
  0x90,0x90,0x84,0x46,0x1,0x87,0x82,0x10,0x24,0x28,0x49,0x21,0x10,0x28,0x12,0xa6
:
:
Execute the application, and get the screenshot as below.
 (Icons and application in the same directory.)
QListWidget *listWidget = new QListWidget;
listWidget->insertItem(0, new QListWidgetItem(
           QIcon(":/Butterfly_32x32.png"), "Butterfly"));
listWidget->insertItem(1, new QListWidgetItem(
           QIcon("Dolphin_32x32.png"), "Dolphin"));
listWidget->insertItem(2, new QListWidgetItem(
           QIcon("Elephant_32x32.png"),"Elephant"));
Please be noted that if embedded icons to be used, you shall add :/ before your resource file. Otherwise no icons will appear in your listWidget. When application and icons are in different directory, you will see only the butterfly icon in the listWidget as below.
 (Icons and application in different directory)
Check the file size, the _QtRC (executable with embedded resources) has larger size than the executable _QtRCwoRC without embedded resources.
(Icons and application in different directory)
Check the file size, the _QtRC (executable with embedded resources) has larger size than the executable _QtRCwoRC without embedded resources.
-rwxr-xr-x 1 cyp1973 cyp1973 32455 2009-05-12 12:05 _QtRC
-rwxr-xr-x 1 cyp1973 cyp1973 14565 2009-05-12 11:00 _QtRCwoRC
ICONS SOURCE, http://www.visualpharm.com/animals_icon_set/ .
2009/05/11
fork() demo
#include <stdio.h>
#include <unistd.h>
#include <sys/types.h>

int main()
{
pid_t self, parent, child;

self   = getpid();
parent = getppid();

int i=0, n=0;

printf("PID: %d, PPID: %d (before fork) \n", self, parent);

child =fork();

if(child==0) { // child process
  printf("child=fork() == 0 (child process)\n");
  printf("PID: %d, PPID= %d\n", getpid(), getppid());

  // i, n in child process
  // to demostrate child and process have their own data.
  for(i=0; i<5; i++) {
     printf("[Child ] i=%d, n=%3d\n", i, n+=10);
     sleep(1);
  }

} else {      // parent process
  printf("child=fork() != 0 (parent process)\n");
  printf("PID: %d, PPID= %d\n", getpid(), getppid());

  // i, n in parent process
  // to demostrate child and process have their own data.
  for(i=0; i<5; i++) {
     printf("[Parent] i=%d, n=%3d\n", i, n+=100);
     sleep(1);
  }

}

return 0;
}
Thanks to Online syntax highlighting http://tohtml.com/ .
2009/05/06
LDD3 Errata
When I read Chapter 3 - Char Drivers of the LDD3
2009/05/05
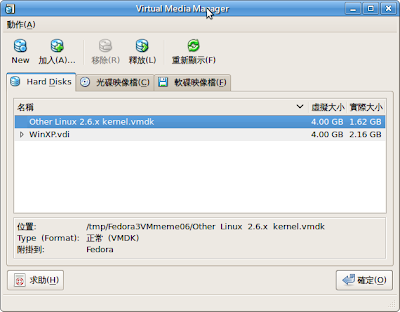
Play .vmdk by Virtual Box in Ubuntu
Ubuntu 9.04 + VirtualBox 2.2.2
1. Add your .vmdk in Virtual Media Manager.
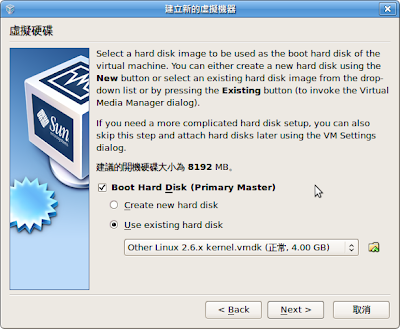
 2. Create a new virtual machine.
 3. Use existing hard disk. (the one just added in step 1.)
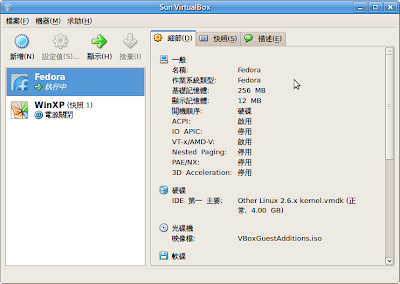
 4. Power on the new Fedora.
 5. Fedora Core 2.6.9 is booting :)
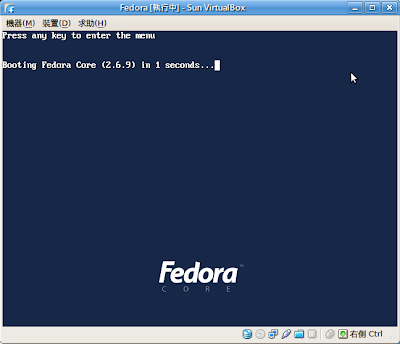 Then I can do something with Fedora in Ubuntu...
No more Windows and VM Ware !
Then I can do something with Fedora in Ubuntu...
No more Windows and VM Ware !
 2. Create a new virtual machine.
 3. Use existing hard disk. (the one just added in step 1.)
 4. Power on the new Fedora.
 5. Fedora Core 2.6.9 is booting :)
 Then I can do something with Fedora in Ubuntu...
No more Windows and VM Ware !
Then I can do something with Fedora in Ubuntu...
No more Windows and VM Ware !
2009/05/01
The Hello kernel module in Ubuntu 9.04
Prepare hello.c and Makefile as below for the first kernel module.
hello.c
#include <linux/kernel.h>
#include <linux/module.h>
#include <linux/init.h>

/*
 use insmod to load module
 msg log to /var/log/messages
 use tail or lsmod to check
*/

static int __init my_init(void)
{
  printk("<1> Hello, Orz...\n");
    return 0;  /* if -1, operation not permitted */
}


/* use rmmod to unload module */
static void __exit my_exit(void)
{
  printk("<1>Bye, Orz...\n");
}

/* register user's init/exit functions */
module_init(my_init);
module_exit(my_exit);

/*
 compile with
   $ make -C /lib/modules/`uname -r`/build/ M=`pwd` modules
   remarks: -C, change directory before read user Makefile
             M, path to module source
*/
Makefile
obj-m += hello.o

all:
         make V=1 -C /lib/modules/`uname -r`/build M=`pwd` modules
clean:
         make -C /lib/modules/`uname -r`/build M=`pwd` clean
To make the kernel module $ make Load the kernel $ insmod hello.ko Check whether the module is loaded $ lsmod Module Size Used by hello 9344 0 : Unload the module $ rmmod hello Check the printk messages $ cat /var/log/messages | grep Hello
May  1 22:24:14 chanyenping kernel: [ 6130.384230] [Hello] Initalizing...
May  1 22:24:35 chanyenping kernel: [ 6151.456077] [Hello] Bye !
Compile kernel module in Ubuntu 9.04 - Preparation
The installed Ubuntu 9.04 here is a desktop version. Therefore I need to install the additional linux source before next step.
apt-get install linux-source
Then you will get a tarball linux-source-2.6.28.tar.bz2 in your /usr/src.
Now change your directory to /usr/src and unpack the tarball.
cd /usr/src
tar xjf linux-source-2.6.28.tar.bz2 &
(or you may unpack in this way
bzip2 -d linux-source-2.6.28.tar.bz2
tar xvf linux-source-2.6.28.tar
A 330MB tar file is generated from a 52MB(?) bz2 file. You can remove it after unpack completed.)
Then you shall get a directory linux-source-2.6.28.
The last step is to make a symbolic link as below,
ln -s linux-source-2.6.28 linux
Now we can start to compile our first kernel module hello :)
ref: http://easylinuxcds.com/blog/?p=3244
訂閱:
文章 (Atom)